Linux Tutorial - Edit, Compile, and Run a Program
Note
This section assumes you have picked up the tutorial
materials and that you have a terminal
window open to your linux-tutorial-files directory.
In this section of the tutorial you will learn how to use the terminal to perform some basic operations in Linux, including how to:
Use a terminal editor
Use a graphical editor
Edit/compile/run in the terminal
Editing files
In many of your classes, you will have to edit text files containing programming code. While there are many graphical editors you could use (either on a CS Linux environment, or on your own computer), it is also important to be familiar with terminal editors that run exclusively from a terminal and don’t require a desktop environment. These editors can be particularly useful if you only have access to a terminal (e.g., if you’re logging into a CS Linux server using SSH).
Using a terminal editor
List the files in the linux-tutorial-files directory. You should see the following:
backups hello.c hello.cpp Hello.java hello.py my_echo.py my-input.txt test.txt
If you do not see these files make sure you have grabbed materials from Introduction to Linux.
Let’s say we wanted to edit the file test.txt. There are many different terminal
editors we could use, but we will start with a simple and fairly intuitive one: nano.
To edit the file, run the following:
$ nano test.txt
This will open the test.txt file in the nano editor, which will look something like this:
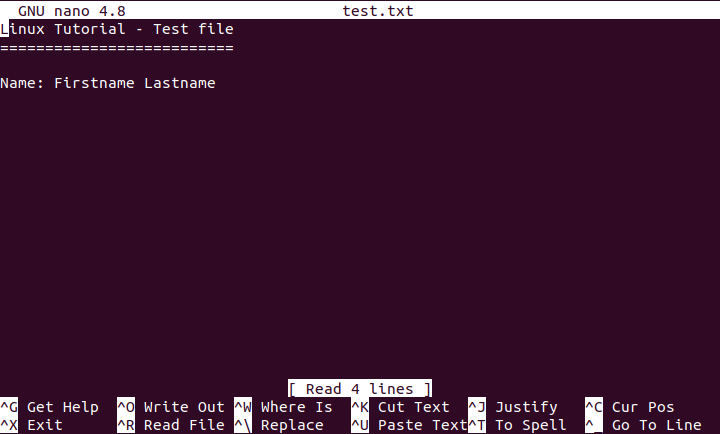
The way you interact with this editor will be very similar to how you use a text editor or a word processor in a graphical desktop environment: you can use the arrow keys to move around the text, and typing text will insert that text at the location of the cursor. You can also use the Backspace key to delete text.
Try removing the text Firstname Lastname and replacing it with your name. Then,
save the file by pressing Ctrl-O (i.e., the Control key and the O key at the same time).
You will see the following prompt at the bottom of the screen:
File Name to Write: test.txt
You can just press Enter to confirm you’d like to save the changes to the same file (however, you could also specify a different file).
The bottom of the screen actually specifies some of the most common commands you
can run in the editor. For example, ^O Write Out refers to what we just did:
Pressing Ctrl-O allows your “write out” (i.e., save) the file (a common abbreviation
for the Control key is ^).
Another common command is ^X Exit. Just press Control-X to exit the editor.
While nano is a simple and intuitive editor, there are many other editors
out there. If you’re interested in a more powerful terminal editor, you
may want to check out Vim or Emacs.
Using a graphical editor
Visual Studio Code is a commonly utilized graphical editor. You can use Visual Studio Code if you are using a desktop environment like Windows or MacOS, or if you are logged into a CSIL computer. If you are using your personal computer, Visual Studio Code will also allow you to connect to the CS Linux servers using SSH.
If you’d like to set up Visual Studio Code, please see the Visual Studio Code pages linked from the left sidebar, starting with About VS Code
The edit/compile/run cycle in the terminal
When writing code, you will very often go through several cycles of the edit/compile/run cycle:
Edit: You edit the source code file to add or modify some code.
Compile: You compile the code into a runnable executable (only in compiled languages; e.g., this step doesn’t apply in Python).
Run: You run the executable to verify that the code you added/modified works as expected.
We have previously covered how to edit files from the terminal, but now we’ll see the basic commands to compile and run your code from the terminal. We have included four example programs in the tutorial files which you can use for this purpose:
hello.py(Python)hello.c(C)hello.cpp(C++)Hello.java(Java)
Compiling and Running Code Examples
Work through the following subsections relevant to your course. You do not need to complete all subsections unless specified by your course.
Python
In Python, given a .py file, such as our hello.py file, we can run it from the terminal like this:
$ python3 hello.py
Hello, world!
Exercise: Try editing the file (e.g., change the message from Hello, world! to Hello, universe!)
and running the program again. You should now see the updated message.
C
C is a compiled language, which means that we first need to compile our program
to produce an executable file. For example, we can compile our hello.c program
like this:
$ gcc hello.c -o hello
We are using the gcc compiler, but some classes may use the clang compiler.
The first parameter (hello.c) specifies the C file we want to compile, and
the -o option specifies the executable file we want to produce.
Running the above command will produce a hello file that you can run like this:
$ ./hello
Hello, world!
Exercise: Try editing hello.c (e.g., change the message from Hello, world! to Hello, universe!).
If you re-run ./hello, you’ll see that the old message is still being printed out:
this is because you need to compile the hello.c file to produce an updated executable.
Once you do so, you should see the updated message when you run ./hello
C++
The process for compiling/running programs in C++ is basically the same
as in C, except we will use the g++ compiler:
$ g++ hello.cpp -o hello++
$ ./hello++
Hello, world!
Java
Like C/C++, Java is a compiled language, although the Java compiler doesn’t produce an executable in the same way that the C/C++ compiler does (we’ll see why momentarily).
To compile a Java file, you need to run this:
$ javac Hello.java
Unlike the C/C++ example we just saw, this will actually produce a
file called Hello.class that is not directly runnable from the terminal
(i.e., running ./Hello.class like we did in the C/C++ example won’t
work). Instead, we need to use the java command to run it:
$ java Hello
Hello, world!
Notice how we don’t have to include the .class extension.
Exercise: Try editing Hello.java (e.g., change the message from Hello, world! to Hello, universe!).
If you re-compile the file and run it again, you should see the updated message.
You have finished the section on editing, compiling, and running programs.
If you have been referred to this tutorial as part of a class you are taking, please move on to the next section required by your instructor.