How does thread/process switching work in Pintos?
This page explains how thread switching, as well as process switching works in Pintos. We recommend reading it alongside the Pintos source code (the text below also includes several links to pertinent parts of the Pintos source code).
We begin by reviewing how kernel threads are represented in memory, and then explain what happens when a kernel thread is interrupted (e.g., by a timer interrupt), first in the simple case where the thread isn’t preempted, and then in the case where we switch to a different thread. We build on this to then explain how context switching works with processes, after first explaining how we can go from userspace to kernelspace (and back again)
Threads in memory
All the information for a thread is contained in a single page
of memory (4 KB in Pintos). The thread struct containing
information about the thread is stored at the bottom of the
page, and the stack grows from the top to the bottom (see
A.2.1 struct thread
in the Pintos documentation for more details).
Suppose we have a thread that runs a function called thread_one()
(i.e., when we called thread_create, we passed thread_one
as the function parameter). We do not need to worry about the
details of how the thread is created; we will simply assume it is
running.
The first entry in the stack for this thread actually isn’t
thread_one but, rather, an entry for a Pintos function
called kernel_thread. This function acts as a wrapper
for the thread’s function, ensuring that the thread exits
as soon as the function returns. This is the code for
kernel_thread:
/* Function used as the basis for a kernel thread. */
static void
kernel_thread (thread_func *function, void *aux)
{
  ASSERT (function != NULL);

  intr_enable ();       /* The scheduler runs with interrupts off. */
  function (aux);       /* Execute the thread function. */
  thread_exit ();       /* If function() returns, kill the thread. */
}
That thread_one function may itself call other functions,
which may call other functions, etc. The information about
each function call is added to the stack (see
3.5 80x86 Calling Convention
in the Pintos documentation for details on the exact format for
each stack entry).
Let’s say the thread is in the middle of running function
foobar(). The thread’s memory may look like this:
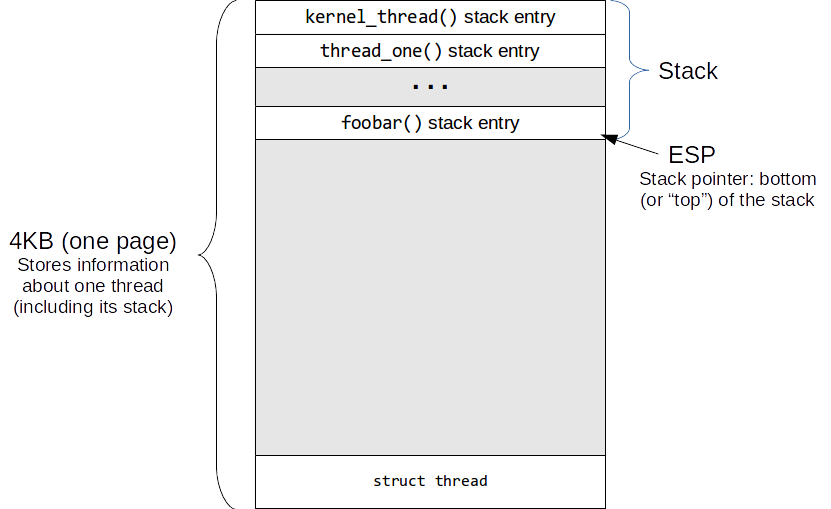
During the execution of the thread, the CPU’s esp register will point to the
bottom-most address of the stack (or the “top” of the stack).
What happens during an interrupt
When an interrupt happens, the CPU automatically pushes the value of the following CPU registers onto the stack:
ss: Stack Segment Selectoresp: Stack pointereflags: CPU flagscs: Code Segment Selectoreip: Instruction Pointer (i.e., the Program Counter)
For now, we can ignore the segment selectors. However, notice
how the CPU saves enough information to be able to resume
the execution of the thread: it saved the address of the next
instruction to run (in eip) and a pointer to the
top of the thread’s stack (so we can return to the exact
chain of function calls when the interrupt happened).
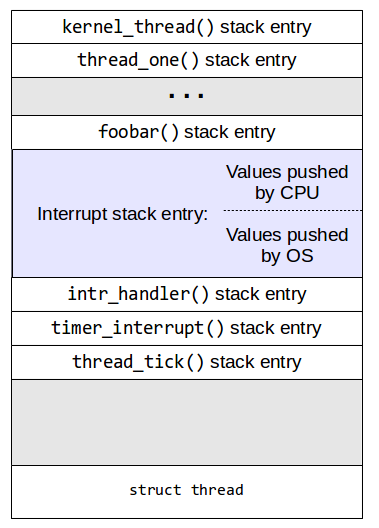
Next, the CPU will inspect the Interrupt Descriptor Table (IDT) and look for the entry corresponding to the interrupt that just happened. This entry will contain a memory location containing the interrupt handler for that interrupt, and the CPU will jump to that location.
In Pintos, the IDT is actually set up to always jump to a function called
intr_entry (source code)
that is implemented in x86 assembly. This function pushes additional data into the stack
(mostly CPU registers). The combination of the values pushed by the CPU and by intr_entry is
called the interrupt stack frame, which is used to save information about the interrupted
thread (or process) and to provide the interrupt handler with the information it needs to
handle the interrupt.
intr_entry also sets up a call to a function called intr_handler
that is implemented in C (source code). This function has a single parameter: a pointer to a
intr_frame struct (source code) that encapsulates all the values in the interrupt stack frame.
intr_handler is the function that will determine what function
to call based on the interrupt type. During Pintos’s initialization
(in the main function) certain functions are associated with
certain interrupts. For example, the timer_init function (
source code, called
from main) assigns the timer_interrupt function to handle
interrupts from the timer.
If the interrupt we’re handling is a timer interrupt, then intr_handler
would call timer_interrupt which, in turn, would call thread_tick.
At that point, the stack would look like this:
In the case where thread_tick does not preempt the running
thread, it would return to timer_interrupt, which will
return to intr_handler, which will return to the
intr_entry function. The assembly code for this
function “falls through” to intr_exit, which restores
the saved values in the stack (using the popal, popl instructions)
and discards the Pintos-saved information from the interrupt stack
frame, leaving only the values that were automatically saved
by the CPU. At this point, we run the assembly instruction iret.
This instruction will restore the values stored in the interrupt
stack frame created by the CPU (ss, esp, eflags, cs, and
eip), restoring the state of the CPU to the point
where the interrupt happened (thus doing an “Interrupt RETurn”).
What happens during a thread switch
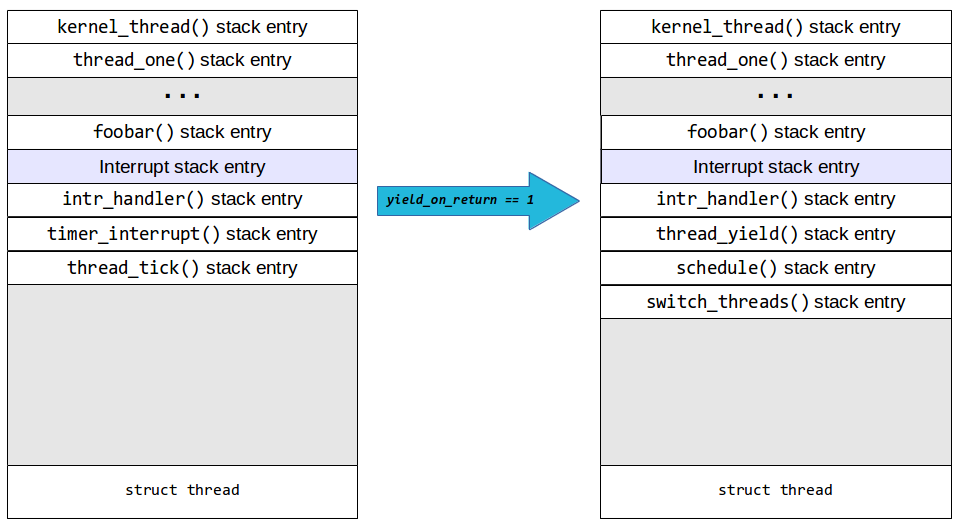
If a thread has used up its timeslice, thread_tick will call
the function intr_yield_on_return. However, this doesn’t yield
to the next thread at that point. Instead, it modifies a flag to let
the interrupt handler know that, before returning from the interrupt, it
should perform a context switch to a different thread (so that, when
we return from the interrupt, we do so with the context, i.e., stack
and program counter, of a different thread).
So, after thread_tick and timer_interrupt return, intr_handler will
call thread_yield, which will call schedule. schedule picks the next
thread to run and calls a function switch_threads, implemented
in x86 assembly, with two parameters: cur (a pointer to the thread
struct of the current thread, i.e., the one that is being preempted) and
next (a pointer to the thread struct of the next thread to run).
So, the stack will look like this:
switch_threads is implemented in switch.S (source code)
The key to understanding switch_threads is to first understand that,
if we’re switching to another thread, that other thread must’ve also
been running switch_threads when it was preempted. In fact, a thread
that voluntarily or involuntarily yielded the CPU will always have
a stack that looks like one of the following:
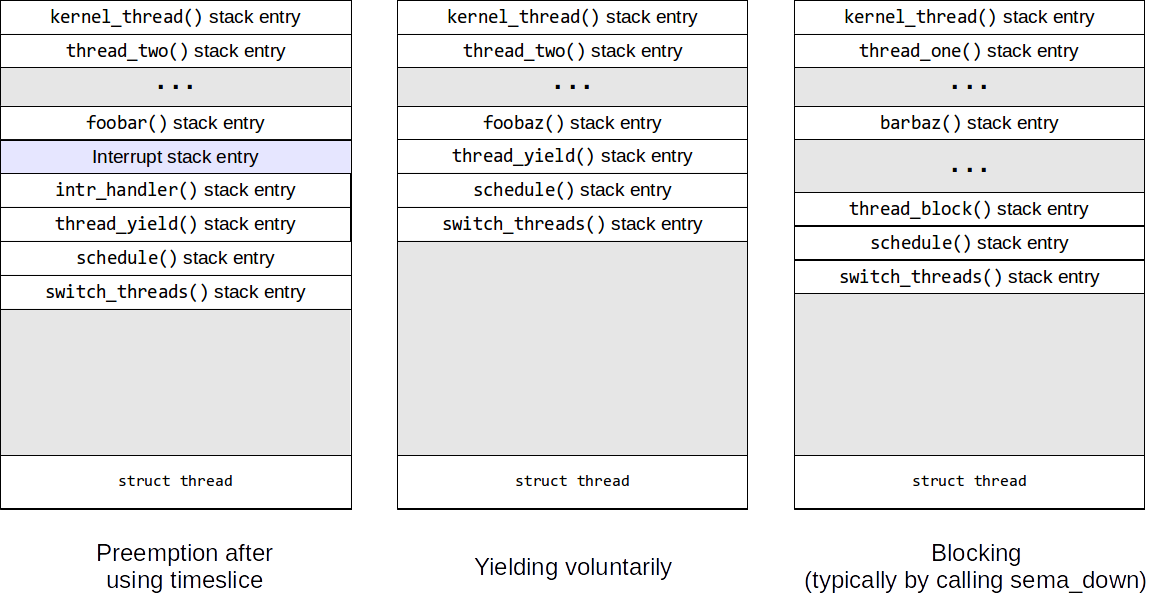
The intuition behind switch_threads is that, to switch to another thread,
we just need to “switch the stacks” (because every thread is guaranteed
to be running switch_threads at the point it was preempted), and we can
do this simply by changing the value of esp. Let’s take a closer look at
how this happens.
Right after calling switch_threads, the bottom of the stack will
look like this:
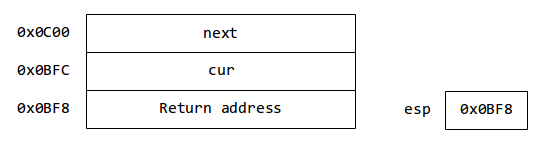
The address of the start of the switch_threads stack frame (0x0C00)
is arbitrary and has no deep significance. However, all the other values shown
would be consistent with the switch_threads stack frame starting at 0x0C00.
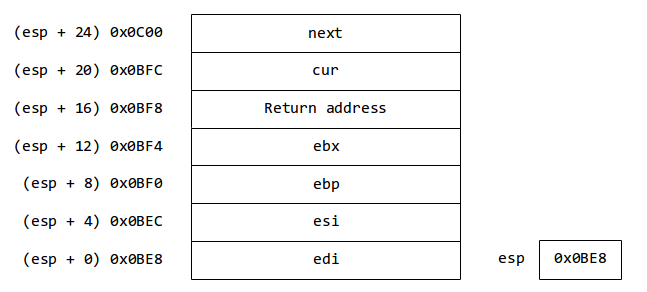
First of all, switch_threads needs to save some registers (this is simply
required by the x86 architecture):
pushl %ebx
pushl %ebp
pushl %esi
pushl %edi
And our stack will now look like this:
Before we see what happens next, recall that the thread struct
stores information about each thread:
struct thread
  {
    /* Owned by thread.c. */
    tid_t tid;                          /* Thread identifier. */
    enum thread_status status;          /* Thread state. */
    char name[16];                      /* Name (for debugging purposes). */
    uint8_t *stack;                     /* Saved stack pointer. */

    /* etc. */

  }
Notice how it contains a stack field. This field is used to save
the value of esp when a thread is preempted. However, in x86 assembly
we can’t just write t->stack. Instead, if we want to access that value
in the struct, we need the address of the struct in memory and
the offset (in bytes) of the field we want to access. This is defined
in thread.c:
uint32_t thread_stack_ofs = offsetof (struct thread, stack);
Since we need to use this value in switch_threads, we load it
into register edx:
.globl thread_stack_ofs
        mov thread_stack_ofs, %edx
Next, switch.h defines SWITCH_CUR and SWITCH_NEXT as the offset of
cur and next within the stack frame (20 and 24; see how this matches
with what is shown in the earlier figure). In x86 assembly, the
expression SWITCH_CUR(%esp) becomes 20(%esp), which
translates to the memory address esp + 20. In other words,
this gives us the address of the current thread (cur).
Similary, SWITCH_NEXT(%esp) gives us the address of the
next thread.
So, the following piece of assembly code:
movl SWITCH_CUR(%esp), %eax
movl %esp, (%eax,%edx,1)
movl SWITCH_NEXT(%esp), %ecx
movl (%ecx,%edx,1), %esp
Is the equivalent of doing this:
cur->stack = esp;
esp = next->stack;
In other words, we save the stack pointer of the current thread,
and set esp to point to the (previously saved) stack
pointer of the next thread to run.
Once we’ve done this, we have switched threads, and all that remains
is to restore the registers we had previously pushed onto the stack,
and return from switch_threads:
popl %edi
popl %esi
popl %ebp
popl %ebx
ret
Switching between kernelspace and userspace
Note: The following section assumes knowledge of how paging and segmentation works (although not necessarily in an x86 architecture)
To understand how context switching works with user processes, we first need to understand how we can go from running a process to running kernel code (which will have more privileges than the user process’s code). Understanding this is useful not just for context switches, but for understanding other aspects of the OS, like interrupt handling and system calls (since, in both these cases, the user process must temporarily yield control to the kernel to handle the interrupt or system call).
First of all, the x86 architecture has four Privilege Levels (PL), numbered from 0 to 3. When PL=0, we are running in the “Supervisor” level, which allows running all instructions. A PL greater than 0 (typically 3) is the “User” level and does not allow certain operations (like I/O, updating certain registers, etc.). For now, we can assume that the “current PL” is stored in a CPU register (this is not entirely accurate, but will be enough for now, specially since the actual way that PLs are handled in an x86 architecture is pretty elaborate).
Now, let’s look at how physical and virtual memory is laid out. Pintos only uses 64MB of physical memory, laid out like this:
0x04000000 +----------------------------------+
           |                                  |
           |            page pool             |
           |             (63 MB)              |
           |                                  |
            vvvvvvvvvvvvvvvvvvvvvvvvvvvvvvvvvv

            ^^^^^^^^^^^^^^^^^^^^^^^^^^^^^^^^^^
           |                                  |
           |                                  |
0x00100000 +----------------------------------+
           |                                  |
           |                                  |
0x000A0000 +----------------------------------+
           |                                  |
           |        Kernel code + data        |
           |                                  |
0x00020000 +----------------------------------+
           |                                  |
           |                                  |
0x0000D000 +----------------------------------+
           |       initial kernel thread      |
0x0000E000 +----------------------------------+
           |                                  |
0x00007E00 +----------------------------------+
           |            Boot loader           |
0x00007C00 +----------------------------------+
           |                                  |
           |                                  |
         0 +----------------------------------+
The above figure omits some parts of memory that are not relevant to this discussion. The full memory map can be found in A.1.4 Physical Memory Map)
A process’s virtual memory looks like this (let’s assume it has already been loaded; we’ll discuss loading later on):
0xFFFFFFFF +----------------------------------+
           |                                  |
           |              Unused              |
           |                                  |
            vvvvvvvvvvvvvvvvvvvvvvvvvvvvvvvvvv

            ^^^^^^^^^^^^^^^^^^^^^^^^^^^^^^^^^^
           |                                  |
0xC4000000 +----------------------------------+
           |                                  |
           |    Mapped to Physical Memory     |
           |                                  |
0xC0000000 +----------------------------------+ PHYS_BASE
           |            user stack            |
           |                 |                |
           |                 |                |
           |                 V                |
           |          grows downward          |
           |                                  |
           |                                  |
           |                                  |
           |                                  |
           |           grows upward           |
           |                 ^                |
           |                 |                |
           |                 |                |
           +----------------------------------+
           | uninitialized data segment (BSS) |
           +----------------------------------+
           |     initialized data segment     |
           +----------------------------------+
           |           code segment           |
0x08048000 +----------------------------------+
           |                                  |
           |                                  |
           |                                  |
           |                                  |
           |                                  |
         0 +----------------------------------+
The memory below PHYS_BASE is userspace (the memory used by the user
process) and the memory above PHYS_BASE is kernelspace
(the memory used by the kernel which, in Pintos, is just a direct mapping
to the full 64MB of physical memory).
Note: The terms “userspace” and “kernelspace” (and “user land” and “kernel land”) are also often used to refer to “running with user privileges (PL=3)” and “running with supervisor privileges (PL=0)”.
However, the above memory map makes it seem like every user process
has unfettered access to the entire physical memory (which would seem to
defeat the memory protection provided by virtual memory). However,
all the mappings above PHYS_BASE are configured to require PL=0:
if a user process (running at PL=3) tries to access them, a page
fault will happen.
The program loader is the part of the OS in charge of taking an executable file, and loading it into memory, creating a virtual memory map like the one above. In Pintos, the program loader is already provided for you, although you will have to tweak it in the projects. It does the following:
- It creates a new kernel thread (source code). In fact, Pintos has a 1-1 mapping between user processes and kernel threads (and does not allow for multiple threads within a process). This thread is placed on the ready list and will eventually run.
- Once the thread starts running, it creates a page table with no mappings between 0 and 3GB, and with the physical memory mappings between 3GB and 3GB+64MB (requiring PL=0 to access the memory addresses in that range)
- The program loaded then reads the actual program from an ELF executable file. In particular, it loads a text (code) segment and a data segment, allocating pages from the page pool for them, and creating mappings between virtual memory and physical memory for these pages.
- It sets up the stack for the process (you will be doing this in Project 2)
- It obtains the “entry point” from the ELF file (i.e., “where does the program start running?”)
At this point, we could just use the x86 JMP instruction to jump directly to the entry point. However, we’re running in PL=0, and we want the process to run in PL=3. While, conceptually, all we need to do is something like “Switch to PL=3 and JMP”, the actual mechanism is more complicated than that, involving the x86 segmentation functionality.
In particular, the x86 architecture has six CPU registers known as segment selectors:
cs: Code Segmentss: Stack Segmentds: Data Segmentes,fs,gs: More data segments.
The value of cs, ss, ds, etc. is a selector: an index into a table of segment descriptors, where a descriptor contains information about a single segment (including, for example, the base and limit of that segment). In x86 there are two tables: the Global Descriptor Table (shared by all processes) and the Local Descriptor Table (one per process), and a selector can point to an entry in either table.
However, modern x86 operating systems don’t create distinct segments per process. Instead, they create global segment descriptors (in the GDT) which define segments as big as the entire virtual memory space. So, they do not use segmentation (in the sense of creating clearly delimited code, data and stack segments per process), but they do use the x86 segmentation functionality because it will be required for switching between Privilege Levels. In particular, the x86 GDT/LDT includes a field that specifies the Privilege Level at which we are running when using a given segment. So, if cs contains a selector for a segment with PL=0, we will be able to run instructions that require PL=0.
So, a modern x86 operating system will often have a GDT with two code segments (one for PL=0 and another for PL=3), and two data segments (one for PL=0 and another for PL=3). The data segments are also used for the stack segment. In Pintos, the GDT looks like this:
| Index | Description | PL | Base | Limit |
| 0 | Empty | |||
| 1 | Kernel Code | 0 | 0x00000000 | 0xFFFFFFFF |
| 2 | Kernel Data | 0 | 0x00000000 | 0xFFFFFFFF |
| 3 | User Code | 3 | 0x00000000 | 0xFFFFFFFF |
| 4 | User Data | 3 | 0x00000000 | 0xFFFFFFFF |
| 5 | TSS | Pointer to Task State Segment | ||
Note: selectors are actually addresses in memory, not 0, 1, 2, 3, etc. but we will use indexes for simplicity. You can ignore the TSS entry for now.
When the computer boots, Pintos sets up the GDT just with entries 0, 1, 2 and runs in PL=0. Later on, we set up the complete GDT (source code).
So, earlier we said that we could think of the “current PL” as being stored in a CPU register, and that was partially true. In fact, our Privilege Level is determined by the current segment selectors. For example, if cs is set to 1, it means I can run privileged instructions. Similarly, if ds is set to 4, I wouldn’t be able to access pages that require PL=0.
So, back to the program loader (which is part of the kernel and, thus, would be running with code segment 1 and data segment 2). We’ve set everything up, and now we need to jump to the program’s entry point, while also switching cs to segment 3 and all other selectors to segment 4. This is done by simulating a return from interrupt (source code). Remember that, as we saw earlier, an interrupt causes the CPU to automatically push the following registers into the stack:
ss: Stack Segment Selectoresp: Stack pointereflags: CPU flagscs: Code Segment Selectoreip: Instruction Pointer
Which are then restored when we run the x86 instruction IRET. So, to perform the operation “jump and change the Privilege Level”, all we need to do is create an interrupt stack frame with the entry point of the program in eip```and the PL=3 segments in ``ss and cs. In Pintos, the interrupt frame we create (before calling IRET) contains the above registers, as well the OS-added ones that we referred to earlier when explaining interrupts. This includes the value of ds, which will be restored in intr_exit.
However, this mechanism won’t work if we want to switch from PL=3 to PL=0 (e.g., when an interrupt or a system call happens). This is because IRET will not allow returning from one privilege level to a more privileged level (it must always involve returning to a privilege level equal or less privileged than the current one). This makes sense: otherwise, a user process could grant itself PL=0 privileges by running IRET in the manner described above.
Instead, when an interrupt or system call happens, the interrupt descriptor table specifies the code segment to use when processing the interrupt (and it is usually set to be the kernel segment). The interrupt entry point then sets the data segment selectors to the kernel ones.
However, we also need to switch to the stack for the kernel thread associated with this process. In x86, we use a Task State Segment. This was a data structure that was originally designed to keep track of each task in the operating system, meaning there would be one TSS per task. The TSS stores many values, including the new value of esp when a user process yields control to the kernel. This is something we need to keep track of because, when running in the kernel, we want to use the kernel thread’s stack, not the user process’s stack.
However, modern x86 operating systems do not use one TSS per process and, instead create only one TSS (since we only need to store the stack pointer of the kernel thread corresponding to the current user process). When an interrupt happens, the CPU checks the TSS and sets esp to the stack pointer stored in the TSS.
Switching between processes
Now that we’ve seen all of the above, it turns out that process switching is simply a combination of thread switching and and switching between kernelspace and userspace. Basically, when a process is running, a timer interrupt will yield control of the CPU back to the kernel, which will result in the interrupt handling procedure we described earlier (eventually resulting in a call to thread_tick). At that point, if we preempt the current thread (and its associated process), we switch to a different kernel thread as described earlier and, if this kernel thread is associated with a process, we switch back to userspace.
The main difference is that switching to a new process will also involve calling process_activate from thread_schedule_tail (a function that is run after switch_threads, but before returning from the interrupt handler). process_activate (source code) updates the CPU’s cr3 register to point to the page directory for the process that is now running, and also saves the value of esp to the TSS (source code).